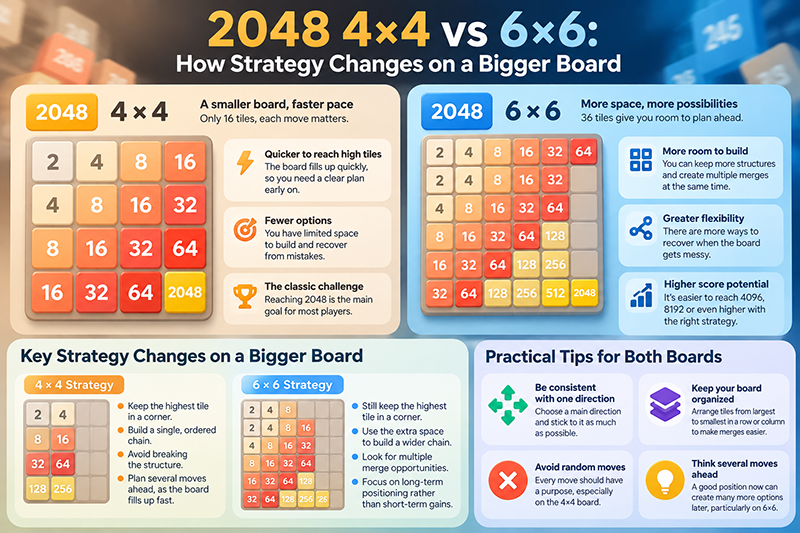
The move from a 4×4 board to a 6×6 board changes 2048 more than the number of available squares. On a 4×4 grid, every empty space matters and a few poor moves can end a run quickly. On a 6×6 grid, you have more room to build, but the extra space also creates longer planning problems, weaker merges, and more opportunities to lose control of the board. Players who switch boards successfully do not simply repeat their 4×4 habits; they adjust how they manage space, choose targets, and evaluate risk.
For practice, 2048playgame.com can be useful when you want to compare the classic board with larger board sizes and observe how the same move behaves in a different space.
The Basic Difference Between 4×4 and 6×6
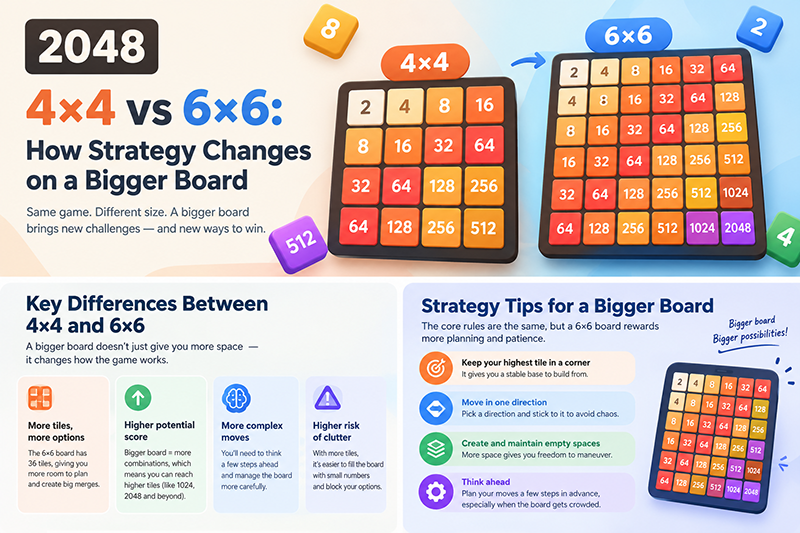
A standard 4×4 board has 16 cells, while a 6×6 board has 36. That difference affects nearly every part of the game:
- More room for tiles: A 6×6 board can absorb mistakes for longer before it becomes crowded.
- Longer merge chains: A single move can combine tiles across a wider row or column.
- More possible positions: The board is less predictable, so planning several moves ahead becomes harder.
- Slower pressure: New tiles usually take longer to block important lanes.
- Different score expectations: Larger boards make higher tile values more practical, but the game may require more moves and patience.
The central objective remains the same: combine equal tiles, create larger values, and avoid filling every cell. However, the best way to reach that objective changes because space is no longer equally scarce.
How Strategy Works on a 4×4 Board
On a 4×4 board, efficiency is the priority. You cannot afford to waste many cells on tiles that do not contribute to your main structure. A reliable approach is to choose one corner for your largest tile, keep the largest values anchored there, and build a descending sequence along two connected edges.
For example, if the bottom-right corner is your anchor, you might aim for a pattern in which the bottom row contains large tiles in descending order from left to right, with supporting values above them. This structure gives your smaller tiles a direction and reduces the chance that a random move will separate your largest values.
Typical 4×4 priorities
- Keep the largest tile in a fixed corner whenever possible.
- Avoid moving away from that corner unless the board is becoming locked.
- Preserve at least one safe direction for new merges.
- Use the open spaces to prepare combinations, not merely to remove one tile.
- Watch the weakest row or column, because it often determines whether the board survives.
The 4×4 game rewards discipline. A move that gains points but damages your corner arrangement may be worse than a quiet move that keeps the board stable. Since the grid fills quickly, every empty cell has strategic value.
What Changes on a 6×6 Board?
On a 6×6 board, the corner strategy still has value, but it is less restrictive. You have enough space to build secondary groups of tiles away from the main corner. Instead of treating every distant tile as a threat, you can use the wider board as a staging area.
This does not mean that the larger board is automatically easy. The main difficulty is that a 6×6 position contains more active pieces. You may have several possible merges, multiple nearly completed sequences, and empty spaces that appear useful but are actually disconnected from your main plan.
The key question changes from “How do I avoid losing space?” to “Which areas of the board should remain connected to my main structure?” A large empty area is helpful only if tiles can move through it and eventually join useful merges.
Typical 6×6 priorities
- Maintain a primary corner or edge for your largest tile.
- Use the middle of the board for temporary construction.
- Keep multiple merge routes available instead of relying on one narrow lane.
- Look farther ahead before making a move, because one action can affect several groups.
- Prevent isolated clusters from becoming permanent obstacles.
Corner Strategy: Essential on 4×4, Flexible on 6×6
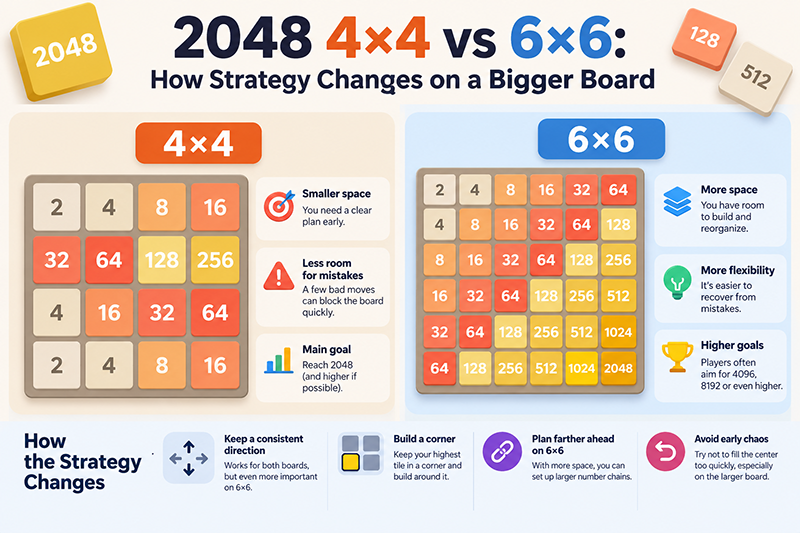
Keeping the largest tile in a corner is one of the most recognizable 2048 techniques. On a 4×4 board, it is often the foundation of a consistent strategy. The limited space makes it difficult to recover if the largest tile moves into the center or becomes separated from the supporting sequence.
On a 6×6 board, the corner is still a strong home base, but you can allow more temporary movement. If a large tile shifts one or two spaces from the corner, the position may remain recoverable because several empty cells are available. The mistake is not moving the large tile once; the mistake is repeatedly moving it without a plan to return it.
Think of the corner as an anchor rather than a prison. On 4×4, leaving it is usually dangerous. On 6×6, leaving it can be acceptable when the move creates a meaningful merge, opens a blocked lane, or prevents a larger structural problem.
| Situation | 4×4 response | 6×6 response |
|---|---|---|
| Largest tile is near its corner | Protect it strictly | Protect it, but allow planned detours |
| A central merge is available | Take it only if it preserves the structure | Consider it if it improves several lanes |
| One edge is crowded | Clear it quickly | Use another area while rebuilding the edge |
| A move creates empty cells | Check whether it breaks the sequence | Check whether the empty cells remain connected |
Managing Empty Space on Each Board
Empty cells are not all equally valuable. Their location, connectivity, and relationship to future merges matter more than their total number.
On 4×4, try to preserve empty cells near the active merging area. If all available spaces are trapped behind larger tiles, the board can become functionally full even when a few cells remain open. A single empty corner may not help if no tile can move into it.
On 6×6, divide the board mentally into zones. You might have a main construction zone along the preferred edge, a temporary zone in the center, and a reserve zone on the opposite side. This separation helps prevent random movement from turning the entire grid into one tangled collection of tiles.
Before each move, ask three questions:
- Which cells will become empty after the move?
- Can new tiles reach those cells or nearby lanes?
- Will the move connect useful groups or create an isolated pocket?
A move that creates two empty cells in a connected lane is often better than one that creates three isolated gaps.
Merge Planning: Short Chains Versus Long Chains
The 4×4 board usually rewards short, carefully controlled merge sequences. If you have 2, 2, 4, and 8 arranged in a useful order, you can often build them into a clear progression. The challenge is making sure the next new tile does not interrupt that sequence.
The 6×6 board supports longer chains, but long chains are also easier to disrupt. You may have several tiles of the same value spread across different rows. Merging them immediately can seem attractive, yet doing so may remove a useful buffer or place a larger tile in an awkward location.
For instance, combining two medium-value tiles on a 6×6 board may create a larger tile that blocks the only route between your center and preferred edge. Sometimes it is better to delay the merge while you prepare the surrounding positions. This is a form of controlled postponement: the merge is available, but not yet strategically correct.
Use a merge hierarchy
When several moves are possible, classify them in this order:
- Forced merges: Combinations needed to prevent the board from locking.
- Structural merges: Combinations that improve the order of a row, column, or edge.
- Scoring merges: Combinations that create points but do not significantly improve the board.
On 4×4, forced and structural merges usually deserve priority. On 6×6, you can sometimes ignore a scoring merge for several turns while preparing a stronger structure.
Choosing Moves: The Lowest-Risk Direction
Many players use a fixed movement pattern, such as repeatedly pressing left and down. This can work as a starting habit on a 4×4 board, but it should not replace evaluation. A fixed sequence becomes especially unreliable on a 6×6 board because it can push unrelated tiles into the same congested area.
Instead, judge each direction by the condition of the resulting board. A good move typically does at least one of the following:
- Creates a useful merge without breaking the main chain.
- Moves the largest tile closer to its protected area.
- Opens a connected lane for future tiles.
- Reduces a dangerous cluster of unmerged values.
- Preserves more than one reasonable follow-up move.
On a 4×4 board, you may need to choose the least damaging option because the position is already tight. On a 6×6 board, you have more opportunities to choose the move with the best long-term shape rather than the move with the most immediate points.
Common Mistakes When Moving to a Bigger Board
Assuming extra space removes the need for planning
A 6×6 board gives you more time, not unlimited time. If you scatter tiles across the grid, the available space will eventually become difficult to use. Larger boards punish disorganization later rather than immediately.
Building too many separate high-value tiles
It can feel productive to grow large tiles in several areas. However, those groups may compete for the same empty cells and become impossible to combine. Choose one main progression and treat other groups as support.
Ignoring the center
On 4×4, the center is often a temporary danger zone. On 6×6, it can be a productive workspace, but only if it remains connected to the edges. Do not fill the central rows with large tiles that cannot move in either direction.
Chasing every available merge
A visible merge is not automatically a good merge. Check where the resulting tile will land and whether it blocks a future route. This matters on both boards, but the wider 6×6 layout makes the consequences less obvious.
Changing the anchor too often
Switching from one preferred corner to another may be necessary in an emergency, but doing so casually destroys the logic of your arrangement. Keep a stable home base unless the current structure is genuinely unrecoverable.
A Practical 6×6 Opening Plan
Players accustomed to 4×4 can use the following opening routine on a 6×6 board:
- Select an anchor edge: Decide where your largest tiles should eventually settle.
- Keep one construction lane open: Avoid filling every cell along the anchor edge too early.
- Use the center for setup: Combine small values there, but do not allow large tiles to form an immovable wall.
- Build in layers: Develop smaller values first, then connect them to the larger edge sequence.
- Review the whole board after every major merge: A successful combination can change which lane is safest.
This plan is less rigid than a classic 4×4 corner routine. Its purpose is to maintain connections and options while gradually moving value toward a stable edge.
Scoring and Long-Term Progress
On both board sizes, score comes from merges, but score alone is a poor measure of position quality. A high-scoring move can leave the board with no useful follow-up, while a low-scoring move can preserve the structure needed for a much larger tile.
On 4×4, efficient play often means maximizing the value gained from limited space. On 6×6, the greater challenge is converting abundant space into a coherent progression. Avoid judging success only by how quickly a larger tile appears. Also consider:
- How many empty cells remain connected?
- Is the largest tile still protected?
- Can several tile groups still reach one another?
- Do you have at least two safe movement options?
These questions reveal whether your score reflects genuine control or temporary freedom.
Which Board Is Better for Learning?
The 4×4 board is usually the better training ground for fundamentals. Its limited space makes cause and effect easy to see. You quickly learn why corner protection, ordered rows, and careful movement matter.
The 6×6 board is better for practicing flexibility, spatial planning, and delayed decision-making. It gives you room to test alternative structures, but it also requires you to recognize problems before they become urgent.
A useful progression is to master a consistent corner-and-edge structure on 4×4, then move to 6×6 and keep the same principles while relaxing the strictness. Protect a main area, preserve connected empty space, and make merges serve a larger plan. The bigger board rewards players who can balance immediate opportunities with the shape of the position several moves later.
The essential lesson is simple: 4×4 2048 is mainly a battle against shortage, while 6×6 2048 is a battle against disorder. On the smaller board, conserve every useful cell. On the larger board, organize the space you have. Once you understand that distinction, the transition becomes far more manageable, and every move can be judged by more than its immediate points.